
So we will lay out for you how to capture steam in your food and product shots. Capturing steam in your images can sometimes be a daunting affair, to make matters worse, the steam won’t last too long. So if you don’t capture it in the first few shots, then you may probably have to reheat your beverage or food.
After a couple of tries, you learn it can get tiring pretty fast plus your food item may start looking bland or not appetizing at all. Stick around though, we share with you some pretty solid tips to ensure that steam shot is everything you want it to be.
Side note though, how hard is it to shoot a movie featuring a ghost? 
Make sure to plan ahead, before placing your food item in the scene, make sure the lighting is OK and all your props and settings are exactly where you want them to be. The steaming food or beverage comes in last.
Set up
Think through your set up and get the props that you want to complement your food item. Just make sure your background and props don’t overpower the subject. I’ve also found that darker backgrounds are best for shooting steam rather than white or light backgrounds. Since steam is a light “air” almost wisps of white, I’d suggest you go with a black or dark background.

Camera settings
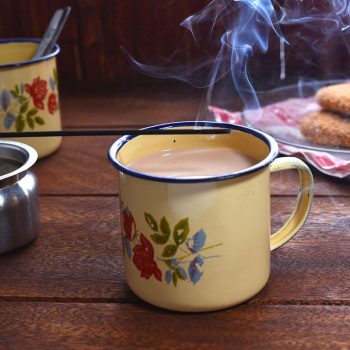
You can play around with your settings as you like, just remember that the lower your shutter speed, the more the steam will look hazy, the faster the shutter speed, the more defined your steam shot will look. My shutter speed was 1/100sec and my aperture was at f8 for this shot:

Lighting
Most of the time when photographing steam, I’ve set up one light on the side of my subject and one light at the back of the subject and particular targeting the steam rising above the cup or meal. For the side lighting, I used a soft box and for the backlighting I used a snoot on the speed light to direct the light to exactly where the steam was. It may have looked something like this:

Also, before we brought in the tea when it was actually hot, we first tested by burning some incense to make sure the steam is being captured properly. I got this trick from Dina Belenko. Once you are satisfied with the results, you can bring in the hot beverage/meal.
Getting the shot
Now that everything is set, this should be pretty straightforward, place your hot food item on the exact spot you had put your test shot. Take your shots and adjust accordingly if need be till you get what you are looking for. Edit as needed.

Congratulations! You got your steam shot.

Alternative ways to get steam in your shot
Some people have used a ball of cotton wool to get steam or more of it in the shot. What happens is, you get a big ball of cotton wool, wet it completely in water and then microwave it for a couple of seconds them place it behind the food item you are trying to photograph. Make sure you have covered the steps indicated earlier then shoot away.
Other people have used steamers to get a decent amount of steam into the shot. If you have a steamer, try using it just above the beverage or meal after everything has been set up and get your shot.
You have to experiment till you get your desired shot.
Any more tips you have to offer? You can share them below.
One Comment