 Cover photo by
 Getting a good transparent product shot can be a bit challenging, a good challenge, nonetheless. It tends to look simple but you can very easily loose edges and sometimes getting the right definition can be daunting. If you have experience with transparent products like glasses or bottles, especially with no fluid, then you know what I’m talking about. Though, it’s not always straightforward, there are a few tips and tricks you can employ to get the product looking just right.
The client brief
A couple of months back, we were tasked with shooting a floating shelf, the catch, however, is it was transparent. We didn’t think we would have too much of a hard time shooting it till we were on set.
The client needed some shots on white and a couple of other shots to show how the product could be used-lifestyle shots. So when we started shooting, we quickly realized there was something we were missing. The edges were hazy and not well defined, the product was also getting lost in the white background. We added some black cards to define the edges of the product and separate the edges from the background.
Something else we encountered was, we needed to raise the shelf from the background. We first tried using acrylic ice cubes to raise it up but then we realized we wanted it higher. The only other thing we could use then, was a copper wire to lift it. It was obviously very conspicuous…as the product is transparent. We, however, decided we’d take out the wire during post production.
 As is common with photography work, we adjusted our lighting and composition around till we got a fantastic transparent product shot.
Here’s a BTS shot when we were shooting on white:
 A breakdown of the image
We used 1 flash light on a strip box and another flash with a reflector to highlight the background (This is after we eliminated another strip box to the right). We later on also added black cards to define the edges better. So we had a black card to the right and left and another on top to define the top and bottom edge of the shelf.
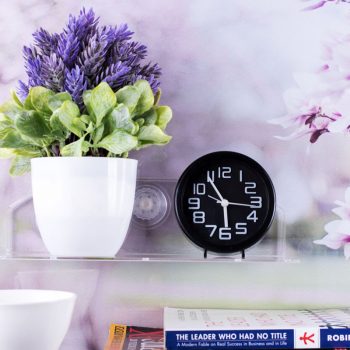
Here’s one of the final images on white that we took:
 Lifestyle shots
I actually think the lifestyle shots were easier to execute since we already had experience shooting the shelf on white plus a background just helps bring out the product. The props also helped bring everything together!
Here is one lifestyle shot we took:
 Tips
Tips
When shooting transparent products like glasses or bottles, remember to:
- ~Define the edges – you can use black/white cards depending on your background
- ~Consider your background – where will the image be used, therefore what is the most appropriate background?
- ~Light your background to illuminate your transparent product
Here are a few more links to ensure your transparent product shot is on point:
Karl Taylor shooting a transparent bottle
Photographing transparent objects for dummies
If you would like to check out our work, visit our site or social media pages below:
Web: Shotbyalama.co,ke
FB: https://www.facebook.com/ShotByAlama/
IG: https://www.instagram.com/shot_by_alama/
One Comment